Stiff knees and tight hips can feel worse than the workout that caused them. Stairs get harder. Walks feel shorter. Sleep gets restless. Most adults do not have to give up their exercise plan or wait the stiffness out. The right set of exercises can restore range, reduce pain, and rebuild the strength joints depend on. This guide reorganises the original RAW Active article into a clearer structure with practical detail, plain-language cues, and safe progressions so the six exercises land well in the first six weeks.
The exercises below are general fitness guidance, not medical advice. Adults with sharp joint pain, visible swelling, a recent injury, or pain that does not settle within 7 to 10 days should speak with a qualified physiotherapist or doctor before adding new exercises to the week. The plan that respects pain usually outperforms the plan that pushes through it. If any move produces sharp joint pain during practice, stop the move and adjust the day rather than the joint.
What Causes Knee and Hip Pain?
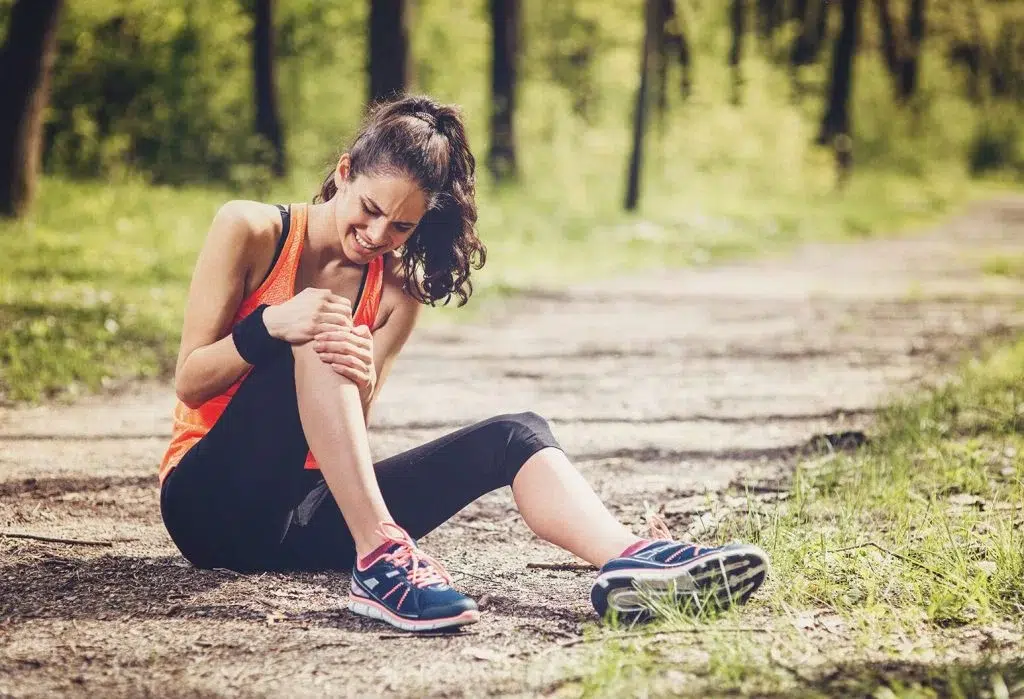
As the population ages, more than 50 percent of working adults will experience some kind of knee pain or hip pain at some point in their working life. Joint mobility has become a bigger deal than ever. A mix of wear and tear, global obesity trends, mostly sedentary work, weak postural habits, and poor stretching routines all feed the same cycle. The body does not need a dramatic injury to feel pain. It needs a consistent underservice of the joints over months and years.
The American Academy of Orthopedic Surgeons and the Osteoarthritis Research Society International recommend a regular training program that combines resistance training, strength training, aerobic training, water-based exercises, and mobility protocols as part of a comprehensive program to combat knee pain and hip pain, and other joint issues. The exercises below draw from that framework.
The Role of the IT Band in Joint Pain
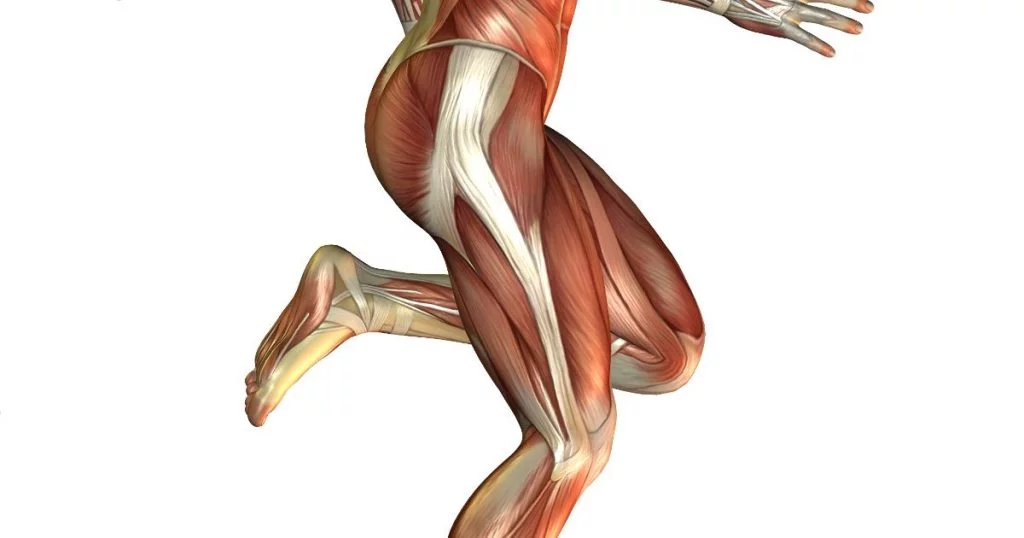
The iliotibial band (IT band for short) is a connective tissue that runs from the hip all the way down the side of the leg to the knee. It is infamous for becoming tight and painful, and it is often the culprit behind knee pain and hip pain in active adults. Overuse of inefficient movement can cause this tissue to tighten, which leads to more inflammation, irritation, and even misalignment of the hips and knees.
Keeping the surrounding muscles of the IT band supple and mobile is recommended. Build mobility work and foam rolling before and after every workout. The crossover forward fold in the six exercises below is one of the simplest IT band stretches available, and it doubles as a hamstring release.
Why Walking Alone Is Not Enough
Walking is excellent for general health, but it does not strengthen the deep hip stabilisers or train the knee through a full, controlled range of motion. Most adults with knee or hip pain need to add strength moves like glute bridges and hip abductions to support the lower body properly. That is what closes the gap between “I walk every day” and “I actually feel stronger in my knees and hips.”
Who This Plan Is Built For
- Adults over 40 with mild to moderate knee or hip stiffness.
- Runners and weekend athletes who feel the joints more after harder weeks.
- Office workers whose hips feel tight from long sitting hours.
- Adults returning to training after a brief layoff.
- Anyone looking for a sustainable home or gym routine that respects the joints.
The plan is not built for adults in acute pain, post-surgery rehab, or recent injury. Those situations need clinician-led care before any home exercise plan starts.
Six Simple Exercise Categories That Rebuild Knee and Hip Health
The six exercises below cover three jobs at once: mobility, strength, and control. Pick the order that fits your week. Most healthy adults benefit from two sessions a week of these exercises, separated by at least one rest day. Each session can run in 15 to 25 minutes, including warm-up and cool-down.
How Each Exercise Helps
- Mobility exercises restore range of motion in tight hips and stiff knees.
- Strength exercises rebuild the muscles that protect the joints through everyday movement.
- Control exercises train the small stabilisers that keep the knees in line during walking, climbing stairs, and lifting.
The combination matters. Mobility without strength often feels better for a day and then slips back. Strength without mobility builds strength in a limited range, which leaves the joint weaker outside the trained position. Run all three categories and the joint rebuilds in a useful pattern.
Why a Simple Plan Works Best
The four biggest benefits of a small, repeatable set of exercises are:
- Easy to fit into 15 to 20 minutes.
- Easy to remember, which is half the battle for adults training on their own.
- Easy to scale up or down based on how the joint feels that day.
- Easy to combine with general strength work without conflict.
The simplicity of the six moves below is a feature, not a limitation. Adults stick with simpler routines, and the joints respond to consistency.
Pairing the Six Exercises With Daily Movement
- Walk 30 minutes a day, five days a week, at conversational pace.
- Add a brief mobility flow before bed on non-training days.
- Hydrate steadily through the day. Dehydration tightens the joints.
- Sleep 7 to 8 hours. Recovery is part of the project.
Exercise #1: Lying Knee Bend Hip Openers
This release opens the front of the hip and eases pressure on the knee after long days of sitting. It is one of the safest mobility exercises for adults with sensitive knees and tight hips. The move is performed lying down, so there is no joint compression to worry about.
How to Do It
- Lie on a comfortable surface with legs outstretched and arms by your sides.
- Bend your right leg and bring the knee upward, sliding the foot along the floor.
- When the leg is fully bent, allow the knee to drop out to your right side, opening the hip.
- Hold for a few moments, then bring the leg back upright and slide the foot down alongside the other leg until fully outstretched.
- Repeat on the opposite side.
Cues That Make It Work
- Keep the lower back relaxed. The lower back should not arch to chase the knee drop.
- Breathe slowly. Exhale as the knee opens, inhale as it returns.
- Move within the available range. The goal is control, not depth.
Common Mistakes
- Letting the foot lift off the floor in the closing phase.
- Pushing the knee drop with the hand instead of letting gravity do the work.
- Holding the breath through the open phase.
- Tensing the opposite leg. The grounded leg should stay soft.
Reps and Progressions
- Working set: 6 to 10 slow reps per side.
- Beginner: stop at the comfortable end of range. Do not chase depth.
- Progression: add a 3-second pause at the open position to deepen the hip release.
Exercise #2: Glute Bridges
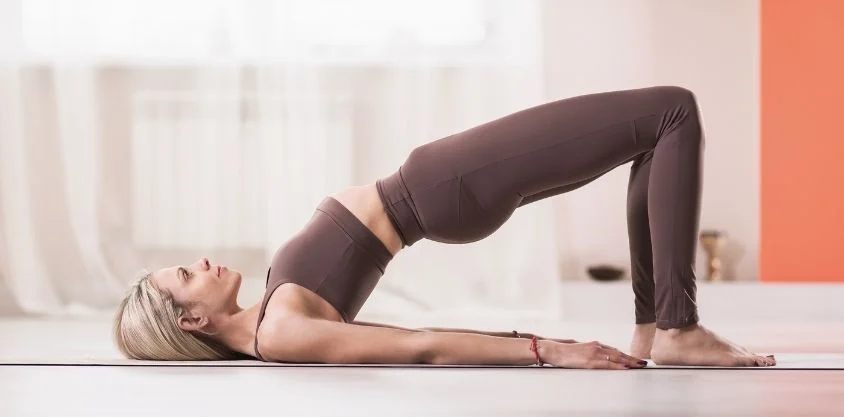
The glute bridge wakes up the back of the hip and takes pressure off the front of the knee. It is one of the safest strength builders for anyone with sensitive knees, and it doubles as a posterior chain warm-up for the bigger lifts later in the week. Most adults under-use their glutes, and the bridge reteaches the pattern without load.
How to Do It
- Lie on the ground with knees bent and feet flat on the floor.
- Place your arms alongside your body with palms down.
- Lift your hips off the ground, squeezing your glutes as hard as you can.
- Your body should form a straight line at the top of the movement.
- Release and lower. Repeat.
Cues That Make It Work
- Drive through the heels, not the toes.
- Squeeze the glutes hard at the top, even if the range is small.
- Keep the ribs down. The lower back should not extend to lift the hips higher than the glutes can produce.
- Press the arms into the floor lightly. They give the upper body a stable base.
Common Mistakes
- Pushing the hips with the lower back instead of the glutes.
- Driving through the toes, which puts the ankles under more load than needed.
- Rushing the lowering phase. Slow eccentrics build more strength.
- Holding the breath. Use a long exhale on the lift, inhale on the lower.
Reps and Progressions
- Working set: 2 sets of 12 to 15 reps.
- Beginner: hold the top for 2 seconds on every rep.
- Progression: add a 3-second pause at the top, then move to single-leg bridges.
- Progression 2: place a dumbbell or kettlebell on the hips for added load.
Exercise #3: Excellent Thigh and Hip Stretches
This stretch needs a chair and a steady surface for balance. It opens the front of the thigh and counters the hip flexor tightness that pulls on the knees. Long sitting hours shorten the hip flexors; this stretch lengthens them back.
How to Do It
- Stand in front of a chair and bend your right leg up behind you, placing the back of your foot onto the seat.
- Hold a stable surface for balance if you need it.
- Bend your left knee to lower your body slightly until you feel a stretch through the front of your right thigh.
- Hold for 10 seconds, then repeat on the opposite side.
Cues That Make It Work
- Keep the ribs stacked over the hips. Do not lean forward to chase the stretch.
- Pull the right heel gently toward the right glute. Avoid forcing it.
- Breathe slowly. The hip flexor lengthens on the exhale.
- Stay tall. The stretch lives in the front of the thigh, not in the lower back.
Common Mistakes
- Arching the lower back to deepen the stretch.
- Letting the standing knee lock out. Keep a slight bend.
- Twisting the hips to one side while reaching for balance.
- Skipping the chair and trying the same stretch on a wall — the chair keeps the foot at the right height.
Reps and Progressions
- Working set: 3 holds per side, 10 to 20 seconds each.
- Beginner: shorter holds, keep the supporting hand on the chair.
- Progression: drop the support surface and balance on the standing leg alone.
- Progression 2: hold 30 seconds and add a 2-second pulse at the end range.
Exercise #4: Hip Abductions
The hip abductor muscles keep the knees aligned during walking, running, and stair climbing. Strong abductors reduce the inward knee drift that drives most joint pain. Most adults under-train these muscles because traditional gym work focuses on the big, visible muscles.
How to Do It
- Stand with feet together and hands clasped in front of you, or holding a stable surface.
- Lift your right foot off the floor and bring your straight leg out to your right side.
- Control the movement back to the start, tapping the toe.
- Repeat 10 times, then switch to the opposite leg.
- Add a resistance band around the ankles to make it harder.
Cues That Make It Work
- Keep the toes pointed forward, hips level.
- Lead with the heel, not the foot or the toe.
- Pause briefly at the top of the movement for a stronger contraction.
- Keep the standing leg soft. Do not lock the knee.
Common Mistakes
- Leaning to the standing side to “cheat” the abduction.
- Rotating the toes outward, which converts the move into a hip flexor exercise.
- Swinging the leg. The motion should feel controlled, not ballistic.
- Bouncing the leg on the way back down, which trains speed instead of strength.
Reps and Progressions
- Working set: 2 sets of 10 reps per side.
- Beginner: without resistance. Master the controlled motion first.
- Progression 1: resistance band around the ankles.
- Progression 2: side-lying hip abduction, which removes the standing balance component.
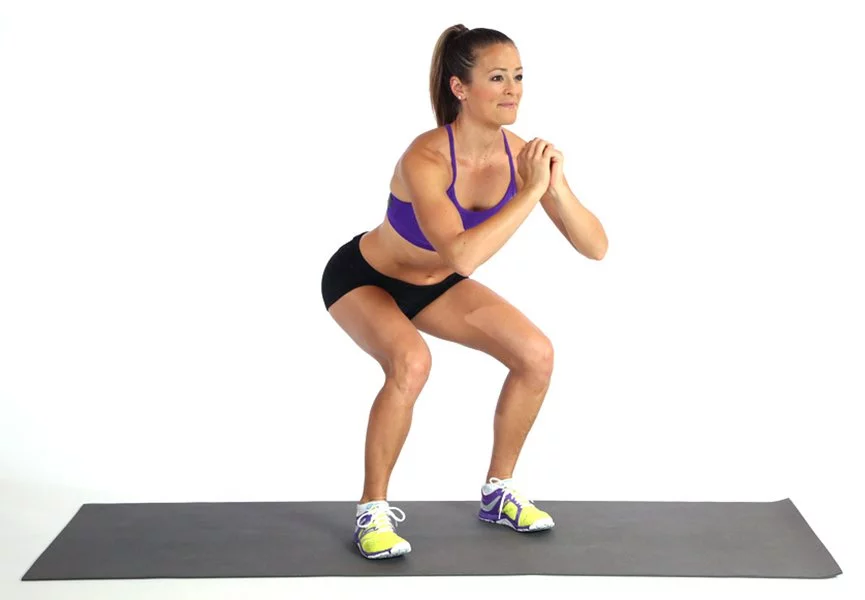
Exercise #5: Bodyweight Squats
Bodyweight squats build the entire lower body and train the knees through their full, healthy range. They are the foundation of every stronger program for knees and hips. Knee pain fears often keep adults away from squats. The opposite is usually true — controlled squat work strengthens the muscles that protect the knees during every other daily activity.
How to Do It
- Stand with feet about hip-width apart.
- Push your hips out behind you as you bend at the knees, lowering your body toward the floor.
- Keep your knees in line with your toes as you bend.
- Keep your head and torso as upright as possible during the movement.
- From the full squat position, push through your heels and squeeze your glutes to stand back up.
- Repeat 10 times.
Cues That Make It Work
- Push the hips back first. The knees should bend as a step two, not step one.
- Keep the heels glued to the floor. Heels lifting puts the knees and ankles under more load than needed.
- Drive through the heels and full foot on the way up.
- Breathe out on the way up, in on the way down.
Common Mistakes
- Letting the knees collapse inward at the bottom of the squat.
- Rising onto the toes, which shifts load away from the glutes and quads.
- Rounding the lower back at the bottom of the squat.
- Going too deep too fast. Depth should grow with control.
Reps and Progressions
- Working set: 2 sets of 10 to 15 reps.
- Beginner: sit back to a chair and stand up. Add tempo and depth from week 3.
- Progression 1: pause 2 seconds at the bottom of every rep.
- Progression 2: goblet squats with a dumbbell or kettlebell.
Exercise #6: Crossover Forward Folds
Forward folds lengthen the hamstrings and stretch the IT band at the same time. They are best done after strength work or at the end of the day, when the body is warm. The crossover element adds a rotational component that targets the IT band more directly than a standard forward fold.
How to Do It
- Stand with feet together.
- Lift your right leg and bring your right foot over and onto the other side of your left foot so the legs are crossed.
- Bend forward at the hips and bring your hands to your toes if you can. If you cannot, this is the area to work on.
- Hold the hanging stretch for 20 seconds.
- Repeat with your left foot crossed over the right.
Cues That Make It Work
- Keep a soft bend in the knees. Locked knees overstretch the joint instead of the muscle.
- Fold from the hips, not the lower back. The hinge should start with the pelvis moving back.
- Let the head hang heavy once the hips reach depth.
- Breathe slowly into the stretch. The exhale relaxes the IT band.
Common Mistakes
- Locking the knees to “stretch harder.” This loads the joint, not the muscle.
- Rounding the lower back to reach the toes.
- Holding the breath. The breath is what lets the tissue release.
- Skipping the cross. The cross element is what activates the IT band specifically.
Reps and Progressions
- Working set: 2 holds per side, 20 to 30 seconds each.
- Beginner: rest the hands on the shins instead of reaching for the toes.
- Progression 1: hold a yoga block in the hands for a deeper fold without rounding the back.
- Progression 2: add a slow rotation under tension at the bottom of the fold.
A Two-Week Starter Plan You Can Use Tomorrow
Follow this layout through the first 14 days. Adjust the reps to the current level.
- Day 1: Lying Knee Bend Hip Openers, Glute Bridges, Hip Abductions, Bodyweight Squats.
- Day 2: Rest or a 20 to 30 minute easy walk.
- Day 3: Repeat Day 1, then add the Excellent Thigh and Hip Stretch and the Crossover Forward Fold at the end.
- Day 4: Rest or a mobility walk on a flat surface.
- Day 5: Repeat Day 3.
- Days 6 to 7: Two full rest days. Sleep, hydrate, and walk lightly.
End every session with 3 to 5 minutes of slow breathing on the floor. It calms the nervous system and helps the muscles let go.
Adjusting the Plan Based on How the Joint Feels
- Sharp joint pain during a move → skip that move for the day and replace it with mobility work.
- Mild muscle soreness during a move → drop the range slightly and reduce by 20 to 30 percent of the load.
- No pain, but tired → still train, just reduce the volume.
- Pain worse the next morning → take the day off and reassess.
What Progress Looks Like Across 6 Weeks
- Week 1 to 2: smaller aches after sessions, better hip range, easier stair climbs.
- Week 3 to 4: deeper squat depth, longer warm-up hold, no next-day soreness.
- Week 5 to 6: stronger glute bridges, smoother crossover forward folds, more confidence on longer walks.
Common Mistakes People Make with Knee and Hip Pain
There are a few traps that quietly slow progress with this program. Watch for them early.
- Skipping the warm-up. Cold joints do not respond to deep ranges. Walk for 5 minutes before the first exercise.
- Going too deep on squats. Only go as low as you can without the knees caving in or the heels lifting.
- Holding your breath. Exhale on the lift, inhale on the lower. Breath control protects the lower back.
- Ignoring pain signals. Mild muscle tightness is fine. Sharp joint pain means stop.
- Relying on stretching alone. Stretching helps, but joints need strength to stay healthy for years.
- Doing too much too soon. Two sessions a week is plenty for the first month.
- Skipping the rest day. Recovery is when the joints adapt.
How Knee and Hip Health Connects to the Rest of Training
Strong knees and hips protect the back, the ankles, and every other lift in the gym. They also hold up daily life — stairs, lifting children, long walks, even comfortable sleep positions. The six exercises above build the foundation. The right strength training progression sits on top of it.
Programs designed for everyday adults, including adults over 40 and busy executives, benefit from this mobility-first approach. Add it to the week and the rest of training will feel different within a month.
The Joints That Depend Most on This Plan
- Lower back. Strong hips take load off the lumbar spine.
- Ankles. Better knee tracking improves ankle stability.
- Feet. Squat mechanics start with the foot position.
- Core. Glute bridges train the posterior chain, which works with the abdominals.
When to Get a Coach or Physio Involved
Self-managed work covers most stiffness. For ongoing or recurring pain, see a professional.
- Persistent swelling or locking in the knee.
- Sharp pain on the outside of the hip during walking or running.
- Pain that wakes you at night.
- A recent injury that has not settled within 7 to 10 days.
- Recurring pain that flares after every session.
- Sharp joint pain during any of the six exercises above.
- Joint pain that radiates down the leg or up to the back.
For these situations, sport therapy and personal training work better together. The therapist handles the manual work. The coach rebuilds the movement pattern. Both are usually needed for the joint to fully recover.
Common Equipment That Helps With the Plan
- Yoga mat. A clean, comfortable surface for floor work.
- Sturdy chair. Used as a support for the thigh and hip stretches.
- Resistance band. Adds load to hip abductions once bodyweight feels easy.
- Foam roller. Helps with IT band and hip mobility between sessions.
- Kettlebell or dumbbell. Optional, used for goblet squats as a progression.
Frequently Asked Questions About Knee and Hip Exercises
How often should I do these exercises for knee pain and hip pain?
Three sessions a week works for most adults. Add a short daily mobility flow on the off days for faster relief. The plan is most effective when it stays consistent across weeks.
Will squats make my knee pain worse?
Bodyweight squats done to a comfortable depth usually help, not hurt. Stop if the knees collapse inward or if you feel sharp pain. Work with a coach to tune depth and pace. Heel lifts and inward knee drift are warning signs.
What is the fastest way to loosen a tight IT band?
Combine the Crossover Forward Fold with foam rolling along the side of the thigh. Daily work beats one long session a week. Most adults feel noticeable improvement within two to three weeks.
Can I do these exercises with arthritis?
Most people with mild to moderate arthritis benefit from this program. Keep the range small and pain-free, and skip any move that produces sharp joint pain. A clinician should clear the exercise plan before starting.
How long until I feel improvement?
Most people feel looser within two weeks. Strength changes show up in six to eight weeks. If nothing has changed after four weeks, get a coach to review the program. The plan should be visible by week four in most cases.
Do I need any equipment?
A mat, a chair, and an optional resistance band. Most exercises can be done in a small home space. A band and a foam roller help when the bodyweight version feels easy.
Can I combine these exercises with running?
Yes. Run on alternating days, with the six exercises on the non-running days. The strength work supports the running week, and the running week does not crowd out the strength work.
What should I do on flare-up days?
Reduce the range, reduce the volume. Skip any move that produces sharp pain. Use mobility and isometric holds instead. If the flare-up lasts more than a few days, see a clinician.
Are the six exercises safe for seniors?
Yes for most seniors, with regression. Most moves can be modified by reducing the range, using a chair for support, and reducing the total volume. Senior-friendly progressions usually mean lowering the volume by 30 to 40 percent of the working set.
What is the single best move if I only have five minutes?
The bodyweight squat. It trains the hips, knees, glutes, quads, and ankles together, and it scales from beginner to advanced without equipment.
Where can I get a Singapore-based knee or hip assessment?
A physiotherapist with sports injury experience is the right starting point. For a structured training plan that respects the joint, the RAW Active personal training page walks through what comes next.